Friday, December 10, 2010

Belted Bubble Dress

Another HotPattern that I couldn't put away! Love this one. It's the Classix Nouveau Uptown Downtown Knit Dress.  I am only showing two versions here, but as soon as I get photos of the others I will post them.


Likes
1) I can sew up the whole thing with just my serger, on 4-thread stitch.
2) It is very comfortable.
3) I can use light-weight or heavier-weight knit fabrics.
4) I can change the look very easily with different accessories.
5) The pattern has 3 different sleeve options included.
6) I can sew a trendy look by using a different fabric for the top and the skirt.


Dislike
I had to experiment a bit with different neckline-to-ribbing ratios, and modify the neckline as well as the hem ribbing.

The blue version is in wool jersey. No need to line it; it is very comfortable. That black belt is waaaay old. Though I still remember I paid $60 for it, 20 years ago. Maybe that's why I can't get rid of it. At least it still fits! 

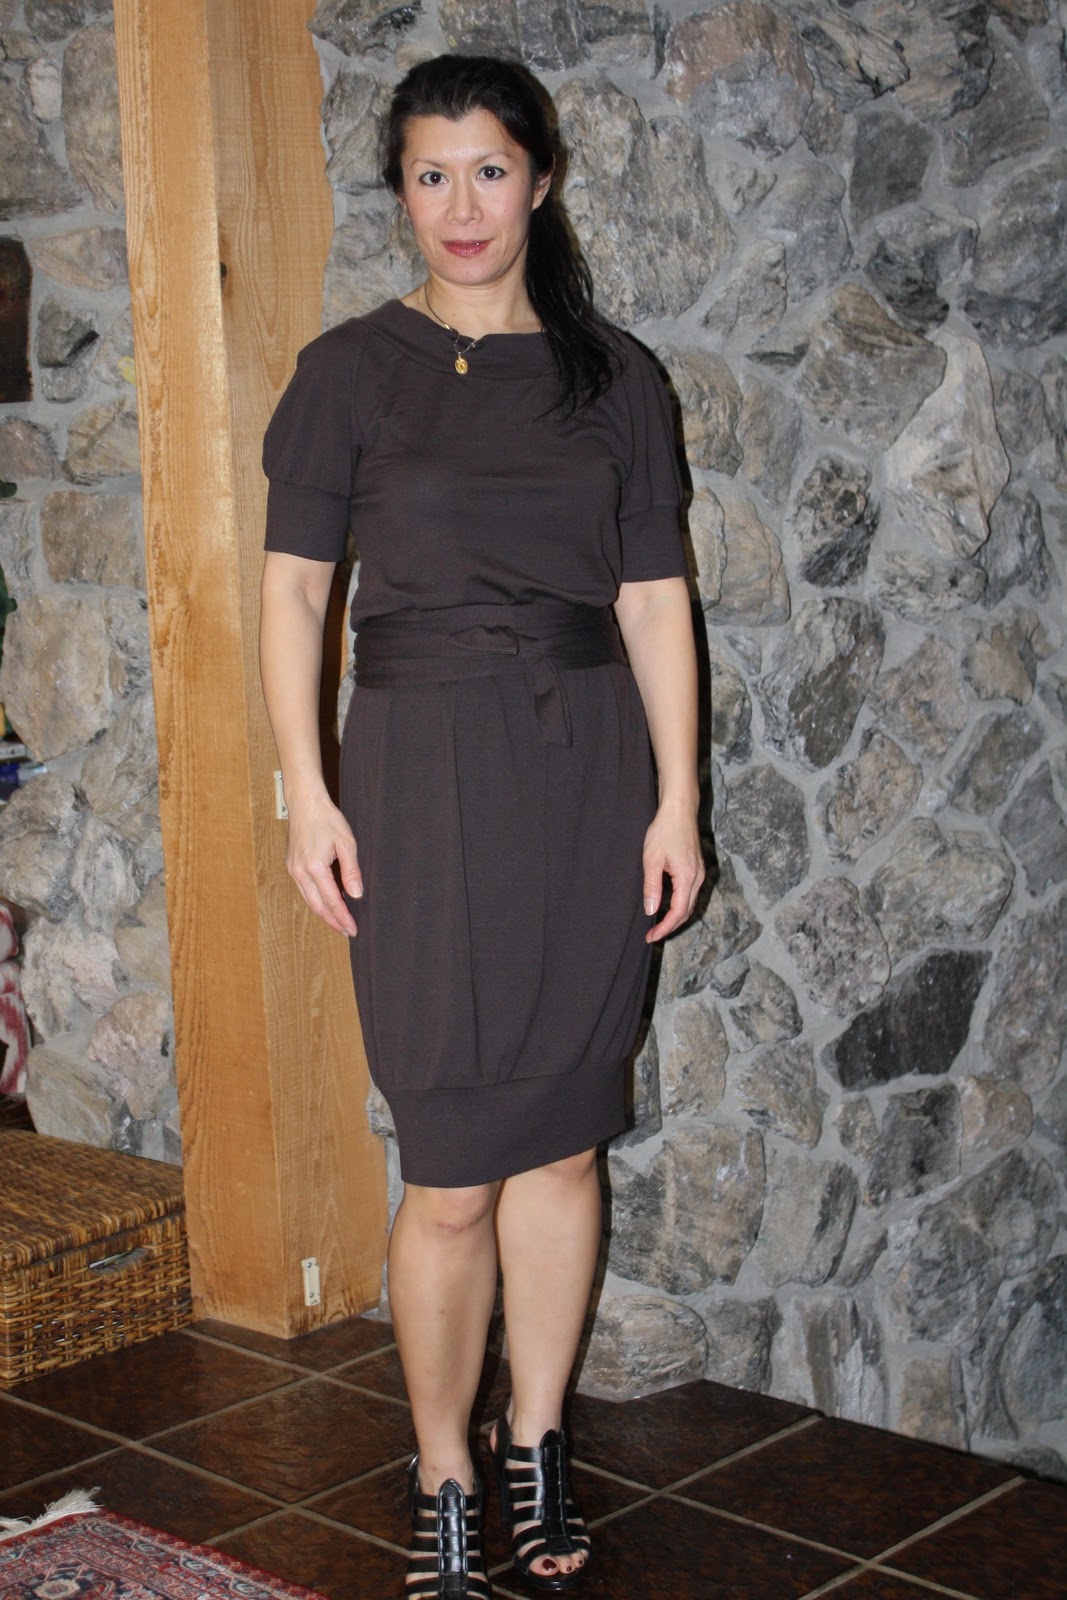
The espresso version is also in wool jersey, but in a much lighter weight fabric. I cut the pattern neckline down about an inch in front for the brown version, but what the heck(?) it's still higher than I thought it would be. More neckline adjustments are to be made. I thought I was modest, but modesty does not have to be unflattering. (sshhh! Those shoes are only for standing-still photographs.)
I cut the hem ribbing way down, to a ratio of about 3/4. I like it much better this way--the silhouette is much more trim and modern. I think HotPatterns meant for you to gather the hem edge into the ribbing, but the pattern has the ribbing cut way too big. So big that there is a danger of the ribbing flaring out--oh no. But stand by for more versions--I can't wait to show you!

Sunday, December 5, 2010

Teardrop Bag


06 Teardrop Bag and 07 Key Keeper Coin Purse


Likes:
Adorable style
Size and shape of bag
Only 3 pattern pieces for Teardrop bag
Only 2 pattern pieces for Key Keeper
Simple construction

Dislike:
Wimpy interfacing


Key Keeper Coin Purse
Just looking at this bag makes me happy. My everyday bag is a big black leather and silver hardware thing with lots of pockets on the outside and on the inside. I never noticed how ugly it is until I made my Teardrop bag. I won't be using my Teardrop bag every day, since it would soon be loaded and weighted down with all the odd items every mom ends up carrying. But for the quick run to the store, a nice dinner out, a swim-team parent meeting, Sunday mass, or any time I don't feel like lugging my heavy toolbox/black-leather-purse, I can throw my wallet and my cell phone into this bag and be free.  I haven't made a lot of bags, and in my garment sewing frenzy, it's hard to change to a bag-sewing mode. But think of it: a bag is something you wear! And no fitting is needed! Also, you don't really have to determine if that shock of color would look good near your face--if you like it, make it into a bag.
The only thing I would change is to try using a bit heavier interfacing, though it might make the pleat not so crisp. Maybe the solution is to iron on two layers, avoiding the pleat area, but especially around the magnet clasp. 
If you don't already have this book, I enthusiastically recommend it. The photos are absolutely luscious, and the directions are very clear and thorough. You just can't go wrong by following these directions. In fact, after making a couple of these bags, you should be able to use Amy's technique to design your own. 


Monday, November 1, 2010

Twinkle Jacket Blouse

Not a great photo, but I'm wearing an ivory silk charmeuse cami underneath--great texture contrast.


This pattern is from the Twinkle Sews book, which I have thoroughly enjoyed. Eye for an Eyelet is the 3rd pattern I have made from the book; I also made the A-Plus A-Line skirt twice (highly recommend!), and the English Garden skirt.
I loved the idea of using black eyelet fabric as in the book's version, and I happened to have some, but it is some kind of nylon fabric with a slight stretch. If you ask me, a little stretch is always good, especially since this is the first top I have sewn from the designer. The stretch fabric made the shaping that is cut into the waistband redundant, but that's okay. So I was eager to try the pattern with a woven, and I've had this sage linen sitting around for ages. I used the big huge snaps on this version since the wide button band is perfect for them. Next? I would love to try making this in wool with a lining.

Thursday, October 28, 2010

Aphrodite for Me!

I already had the size 6 cut out, and so to make a version of HotPatterns Mighty Aphrodite top for myself, all I had to do was to taper the waist and hip area to about an 8 while cutting. Oh, yes, and trace out the long sleeve. So this went FAST! Finished in about a day, in between driving kids to activities and cooking meals.


While cutting out the pieces, I discovered a great way to get the grainline more accurate. This fabric, a rayon knit, I think, has very wavy selvedge. I think these knits are usually knit in a tube, then the tube is cut open and the edges glued so they don't unravel. So there was no way I could use the selvedge as a grainline reference. Here's what I did, using 3 quilting rulers.


1) Line up a large quilting ruler somewhere off the pattern piece, right along a row of knit stitches. You may have to pick up the fabric and rearrange it so that it is straight.

.
Lining up the stitches along the ruler

2) Use one 12" ruler to measure from the large ruler to the grainline marked on the pattern piece. It is much easier to place the piece and the rulers so that the mark is to the nearest inch. That way you won't have to remember fractions of an inch.
3) Use another 12 ruler down at the other end of the pattern piece to measure the same distance as the first 12" ruler. If the measurement doesn't match, then pivot the pattern piece without moving the other end, so that it does. In the photo I used a shorter ruler because I couldn't find my other 12-inch(these things are so handy, everybody in the family uses them.)

Other sewing details
1) While reading the instructions more closely this time, I figured out how they wanted me to sew the hem flounce on, though it still leaves out a couple of steps. There is no "slit" needed for the drawcord to pass through because you turn it up at the hem, then open the wide seam allowance out and stitch the channels. The drawcords will come out of the bottom of the channels. The flounce is supposed to be sewn on, tapered to the drawcord area. It just needs a snip to let the seam allowance free from the drawcord channel. So you bypass a triangular piece of the flounce as you sew it on.

2) In the comments section of my pattern review of this top, Nancy K provided some very helpful info on sewing the shoulder pleat. Yesss!

I traced this out and couldn't figure out the pleats either, so I emailed Trudy and got a diagram back. The notches line up as follows: the first notch which is single, lines up with the first of the next two notches. The second one lines up with the first of the next two etc.


3) I used my serger to sew a 2-thread rolled hem at the edge of the flounce and at the sleeve edges. In the ITY versions I did not finish off the flounce edge at all. (Check RTW--they do it all the time now!)

Tuesday, October 26, 2010

Goddess T-shirt

Well it seems I'm drawn to designs reminiscent of classical Greece. While browsing through Off the Cuff   I was intrigued by one of the new HotPatterns she was exclaiming over. I had tried two HotPatterns before, and though I liked the concept and loved the drawings, the actual garments I had made seemed a bit, well, not right on. But okay, so it's easy to click on links and soon enough I found the absolutely charming HotPattern videos. I have to admit, it doesn't take much to sell me on anything having to do with sewing! These videos are wonderful and I just loved that there is a story behind each design--of course! Found myself ordering 3 patterns, one of which is the Deco Vibe Mighty Aphrodite Draped T-Shirts pattern. I was thinking of making it for Isabel, my 16-year-old Greek Goddess. 
A while ago, I was going crazy over ITY fabric, and bought a boxful from FabricMart. I still have quite a bit left, and when I saw the Mighty Aphrodite pattern, I knew ITY's drape and stretch would be perfect for it. Also, it seems wrinkleproof and almost indestructible.The chocolate color was supposed to be my muslin, but I think it actually looks better than the red, which, even for the holidays, seems a little bit unnatural. Take a look at the two different colors. They are both exactly the same size, except I noticed on the red version, that the sleeves were a bit loose so I cut the hem off, tightened the sleeve and re-hemmed so it is a little shorter. Isabel also prefers the chocolate. I thought it would look quite dull, but it actually looks great with her hair color.


 And good news! I found a stash of fine rayon knit to make a version for myself! It will be in dark gray, maybe a size up.


Sunday, October 24, 2010

T-shirt Rebellion

I refuse to wear T-shirts. They look absolutely terrible on me and worse, make me feel completely dowdy. But souvenir T-shirts are still fun to receive, and they can be great conversation starters for meeting strangers with a shared interest. 
So this is what I do with T-shirts. I cut them up with no regret! Slash, lop and snip! No more chokey neckline! No more baggy waist! 
The Jalie pattern I like to use as a template is a tank/camisole top with a marvelously flattering cut which I have used over and over and over again. Unfortunately I do not think Jalie prints the pattern anymore, but it wouldn't be complicated to draft your own. 


 For the Chicagofight top, I used a strip I cut off from the hem to create straps. One side is "hemmed", the other side is a double raw edge. I needed more strips to create the lattice effect, so I cut more strips off the bottom of the T-shirt and  "hemmed" them to match the cut off hem.


For the Aldo Nadi top I created wide straps/sleevettes by cutting rectangles the length of the measurement over the shoulder from front bodice to upper back, and about 6 inches wide. Then I simply gathered the ends of the straps and sewed them onto the fronts and backs.

So don't be afraid, cut into them! Your T-shirts are bound to look better than before!

Wednesday, October 20, 2010

Goddess dress

Okay, I've decided to fire this blog up again, after a long absence. I was somewhat annoyed by how long it takes to load photos, but I think it might be better now.

I made this dress from Burdastyle magazine pattern 7-2010-117, for my niece, Malia. Available for download at Burdastyle.
It looks fine in the photo, but it is about 2 sizes bigger than I would have made for myself. The ITY fabric is really stretchy. This is the second version of the dress I've made. 


The first was in white, for my daughter, to wear at a wedding. And yes, she looked almost too fabulous. We were concerned about her having exposed shoulders in the church so we added a dark blue military style jacket which I think went perfectly with the dress. She loves contrast, too. But guess what--all the bridesmaids were shamelessly wearing completely strapless dresses! Yes, you knew it! At the reception, my daughter had a little bit of slippage of the upper edge of the bodice while she was dancing, but well, she moves around quite a bit. Malia really liked the dress so I promised her one, which conveniently  arrived around her birthday. 

Some sewing details: On the white version I underlined the whole dress with self-fabric. This was necessary, as it is white. However, this thickened the seams. It was okay, as no one but me would notice this. The directions have you doubling the fabric for the drape but I didn't think this was necessary, so I used a single layer for the navy version. You should experiment with positioning the lower end of the drape before sewing it in, somehow. An afterthought on my part. I think different fabrics definitely drape differently. On the navy version, I twin-needle stitched the hem, but on the white version because of the underline, it would have been too thick, so I used the pseudo blind-stitching feature on my Pfaff.

Sunday, January 24, 2010

Winner!


Patternreview.com had a Sewing for Men contest, and I entered the pea coat I made for Eamon. This was the first thing Eamon ever asked me to make for him so I had to admit I was delighted, and worked on it steadily until it was finished. The pattern is Burda Magazine 10-2006-129. They made it up in leather and their pockets were placed much higher due to the belt in the design. I eliminated the belt and made it in black heavy wool. My pattern review

I also entered the Pendleton wool shirt I made as a Christmas present for Mike. Got some nice comments on this, too, but the pea coat was very popular, and it won 1st place! The prize is a free online class at Patternreview.com. Excellent--I will use it!


Sewing for Men Large

By the way, I have a group on flickr.com called Sewing for Men. I've been trying to get it going, but it has bee tough attracting entries, so spread the word!

Shirred Stretch Dress

Burdastyle's  Stretch Jersey Dress 08/2018 #112  is sure to be one of my all-time favorites. I'm sure I will make this over and ove...